About Me

My photo
Welcome to Artsy Acorn! I love all sorts of art, photography, and making fun and unique items out of trinkets and found items. Enjoy creating and learning with me!

Saturday, February 8, 2014

Going Global

I discovered the trick of making custom dyed paper lanterns a little while ago, and have been hooked every since.  They are a super easy way to liven up a corner of the room (and did I mention cheap?)!

To start, I bought a few packs of white paper lanterns at the craft store.  The sets I bought were in the party section, came in a pack of three and were various sizes.

After assembling the lantern, I went about making the "dye" for my lantern.  I used a spray water bottle, ink refill in the color of my choice (where, chocolate chip), and rubbing alcohol.  I dropped about 50 drops of ink refill in the bottle and then filled it about 3/4 full of rubbing alcohol.  Why rubbing alcohol?  It will dry much faster than water and prevent the ink from running as a result.


Take your lantern and spray bottle outside if possible because this will make a mess!  I recommend wearing rubber gloves for this project so your hands do not temporarily turn the color of your new lantern (trust me, I have experience with dying my hands!).  I also recommend squeezing the spray bottle a few times away from you and your lantern before actually angling toward you so the ink and alcohol mixture has a chance to work through the spray bottle.

Holding the lantern away from you, start spraying the lantern in even strokes.  You'll want to rotate the lantern as you spray so you cover the entire surface of the outside.  After you finish spraying, keep rotating the lantern with your wrist for a minute or two to make sure you have no drops wanting to form.  The alcohol will dry rather quickly, but feel free to set it down on a work surface while it dries completely before bringing back in the house.


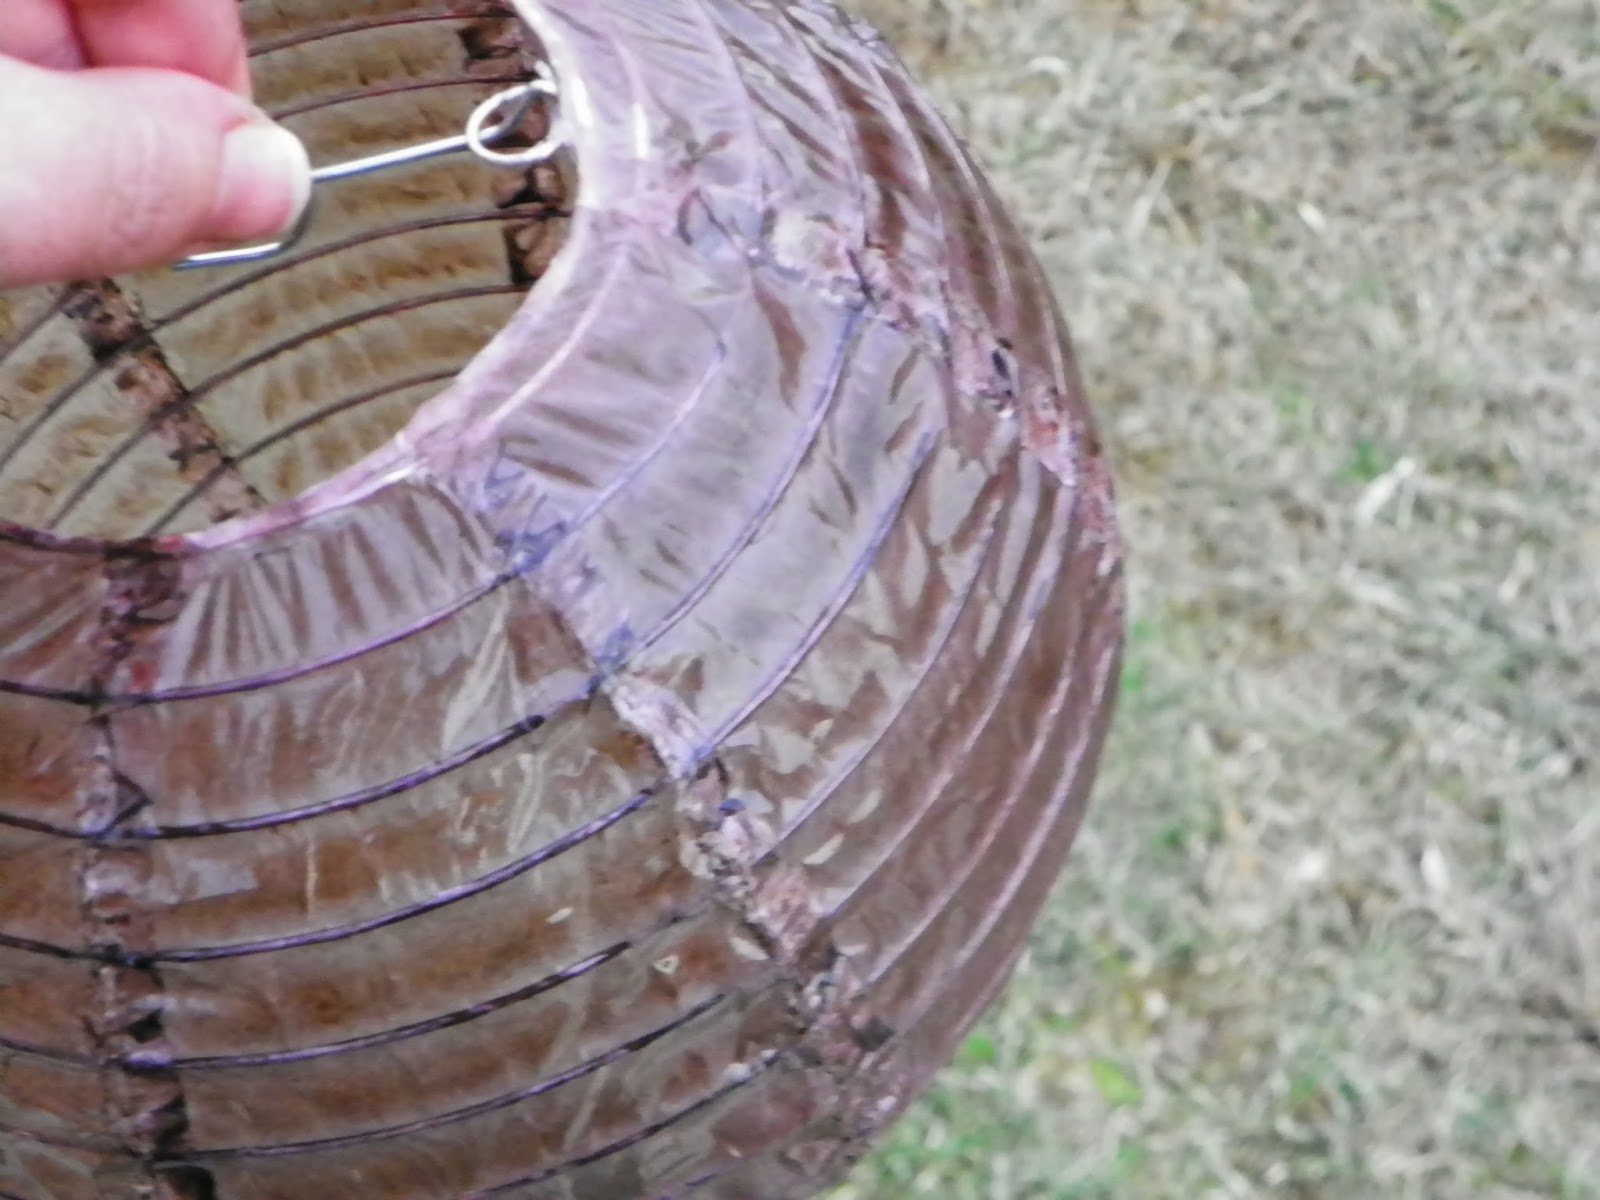
Finally, take a paper towel and wipe off any excess ink from the wire frame on the top and bottom of the lantern.  I forget this part frequently and end up having a little ink on me when I string them up!

Speaking of stringing up, I used ribbon and thumb tacks to hang my lanterns.  I cut the ribbon much longer than I knew I would use because I wanted to make sure I had room to adjust and stagger the lanterns as they hang.  After getting the lanterns placed where I wanted, I then went back and trimmed off any extra ribbon.


Monday, February 3, 2014

Think Outside the Cage

I often find myself using the phrase "think outside the box" when it comes to ideas and concepts.  So when I found this little birdcage on clearance this fall, I knew I needed to think outside the "cage."

Here is the birdcage before it was "Stampin' Up'd."


To start, I cut a piece of Chocolate Chip card stock in quarter inch strips lengthwise. I then ran each strip between my fingers to help break down the fibers in the paper and help it bend easier.  By bending and squishing the paper strips together in a circular pattern (technical terms here, right?), I make a loose bird nest.  This was hot glued on a paper doily and placed in the birdcage.  A few scraps of Soho Subway DSP scrunched up made three little eggs for the nest.


6 strips of Soho Subway designer series paper cut in quarter inch strips decorated the cage.  First, I rolled half a strip around each corner column of the cage.  Feel free to glue this in place, but I found it easy for the paper to stay in place with tight rolling.


Next, I weaved a strip through the diamond pattern on the bottom and top of the cage.  It took two pieces of paper to complete the weaving in each section.


For the embellishments, I tied a scrap of burlap ribbon to the side of the birdcage.  To give the embellishment a more tattered look, I trimmed the hem of the burlap ribbon off the tail sections of the knot.  After trimming the edges, it was easy to fray the ribbon.


Next, scraps of Victoria crochet trim and Crushed Curry chevron ribbon were hot glued to the center of the tied burlap piece and cut diagonally.  Soho Subway paper and the Spiral Flower Originals die made the flowers, which were hot glued to the center of the ribbon bundle.  A vintage faceted designer button in the center of one of the flowers makes the flowers look polished.


Tip: The silicone craft sheet makes adhering the paper flowers much easier!

Final touches were added by added using large pearl basic jewels to the latch of the birdcage and placing several leaves punched with the bird builder punch and Old Olive card stock to the ribbon and flower embellishment.  


Saturday, February 1, 2014

Three Wise Men

I've had the pleasure to grow up with three extremely special men in my life, and honoring them with something I made is just as special.  You see, I have two kind, wonderful, and amazing brothers who were both born with cerebral palsy.  Jonathan and Josh are 29 and 22 and live with my mom.  Along with some great caregivers, our family is able to take care of the their physical needs and are given much love and affection in return!


My dad, who passed away five years ago from lymphoma, rounds out my three wise men.  So when the time came to think of a present for my mom, it was natural to think of our three wise men.

Each of my men has a saying and I wanted to incorporate these into some artwork for my mother's home.  I grew up with my dad saying "It'll Be What It'll Be" whenever I'd get too wound up or needed to be reminded that things weren't in my control and needed to be given to God.  My dad was a farmer, so many things involving his work were out of his control.  "It'll be what it'll be" became our slogan for many things around our household.

Jonathan, my middle sibling is our social butterfly and has to be in the center of everything.  He loves going and being around people, which makes sense why he always says "I Gotta Go!"  He oftentimes will wake someone in the house up at the crack of dawn with "I gotta go!"

Josh is my youngest brother and is so sweet, kind, and loves just hanging out.  However, along with his sweetness he has a sarcastic side, and we often find him saying "Uh-huh" not only in affirmation, but also when it's quite ironic.  So, these three sayings mean a great deal to our family and represent aspects of our family that are truly unique.

I'm always inspired by mixed media work and have always wanted to do something with this art method.  So, I decided to make a set of three canvases for my mom's hallway, with one of the sayings on each canvas.  Since my mom has the ultimate green thumb, I decided the decorations for the bottom of each canvas would be a field of flowers.

Here is the final product!  I wanted the canvases to be separate, but to coordinate together and flow from one canvas to another.


First, I took 1 part cobalt blue acrylic paint and 2 parts water to create a wash that I painted over the surface of each canvas.  This gave me the light blue background for the sky.  I also suggest having a paper towel handy to blot some of the paint if you want a lighter affect.

I sketched the line of the hills with a pencil so I would have a guide as I added my paper.  To make the grass, I used approximately 3 sheets of 12 x 12 DSP and 1 piece of 8 1/2 x 11 Old Olive cardstock.  These were ripped into strips and added to the canvas using modge podge glue.  Modge podge is used as an initial layer of adhesive, then add a piece of your paper to the surface, pressing down to ensure you have no bubbles.  Another layer of modge podge on the top of the paper (repeated while layering pieces of paper) will give you the look of grass.

Tip: I also wrapped paper around the edge of the canvas to give each canvas a finished look.

The flowers were made using a variety of colorful DSP papers (matching the colors in my mom's house) and punched with a Blossom Builder punch.  The stem was created with a small strip of old olive card stock, modge podged in place.  Then, the petals were added in various patterns.  The leaves were actually punched petals using the same DSP paper used for the field.  A final layer of modge podge completed the look.


Tip: Before using your adhesive to glue everything down, lay out your pattern first to ensure it looks just how you imagined!

I used a pencil to sketch out each saying before writing it out officially with a black sharpie pen.  Once everything dried, a few layers of a spray acrylic sealer will preserve each canvas and makes them easy to dust.


Friday, January 31, 2014

Pulling it all Together

My table has been in need of a little refresh lately with some cute decoration, so I pulled some of my favorite Stampin' Up! products to liven up my table!

I recently posted about making an adorable modge podge birdie and wanted to make a few other goodies to go along with it.  

I took a glass hurricane already in my home and added a bow of 1 1/4" burlap ribbon around the neck.  I used two half yard strips to accomplish this.  First, one strip was wrapped around the neck of the hurricane, folded over once and hot glued to hold the two ends of the ribbon in place.  This helped to make the extra tails of my bow.  Second, I tied a bow using the second strip of burlap ribbon and hot glued it to cover the fold from the strip making the band around the hurricane.  These were then trimmed to length.  

Next, I hot glued a button from the naturals designer buttons collection to the center of my bow and added some extra detail to my ribbon with an Early Espresso ink pad and sponge dauber.  

A final detail was added to the hurricane by punching out a two blossoms using a scrap of Soho Subway paper and the blossom punch.  In the center of the blossoms, I added a cork flower embellishment from the new Sale-a-bration Sweet Sorbet accessory pack.  These were adhered to the each side of the bow with some velcro.

Tip: A velcro spot on each side of the bow means I can easily interchange the accessories on each side of my bow depending on the season.  If you aren't interested in changing it out, hot glue works great for adding your flower embellishments to the side of the bow!


For the final decoration, I laminated one piece of 12 x 12 Designer Series Paper is Soho Subway to make a mat for my hurricane and little birdie.


Wednesday, January 29, 2014

Simply Scrap-alicious!

I put together the Everyday Occasions kit a few weeks ago and I love it for more than one reason.  Not only do you have great cards, you also get a few extra embellishments.  I'm not the kind of person to let any scraps go, and have always enjoyed finding a creative place to use them.  So, when it came to updating my This n' That journal, I thought this was the perfect combination!  Check out how some of the elements from the Everyday Occasions kit have been integrated into my journal!


The tags and feathers from the Everyday Occasions kit works perfectly with my page of pictures from the Grand Canyon.


The pink sunburst, honeycomb banner, and a bit of glitter paper from the Everyday Occasions kit add a little pizzaz and bling to my New Orleans page!  I combined this with the Retro Fresh journal pages and the Epic Day stickers.  These all use similar colors and themes, so I can mix and match!


The title, the hearts, and side banner from the kit are ideal for my San Francisco page.  The grey, white, and aqua coordinate perfectly with my pictures of the bay.


Tuesday, January 28, 2014

Designed Decorations

I found these beautiful curtains in a discount store recently and was immediately drawn to the pattern, not to mention how they would work well with my yellow walls.  After hanging them in the living room, I wanted to bring another element of that style print to my living space, which led me to the Eye Catching Ikat photopolymer stamp set from Stampin' Up!


Once you go photopolymer, it's hard to stamp with anything else because they offer the same great patterns and quality from Stampin' Up!, but in a completely clear design.  It makes the placement of your work simple and quick, which is perfect for making a pattern or print with the stamps.


Another great feature of photopolymer?  You can easily lay out the design you want to use and see how it looks and rearrange if needed!  I've played around with several prints so far.


In experimenting with the idea of making a print, I tried ink and fabric paint.  You can certainly customize this to your needs!  However, I found that the fabric paint didn't give me the look I envisioned.  In testing the ink stamped on canvas, I loved how some of the texture of the canvas came through the ink.  So, I went with that!

To develop my print, I purchased a yard of a canvas fabric from my local craft store and grabbed a few clear blocks for mounting the photopolymer stamps, stampin' mist, and stampin' scrub stamp cleaners, and the following ink colors to match my living room: Pool Party, Cherry Cobbler, Summer Starfruit, Gumball Green, and Early Espresso.


The most difficult part of this was deciding which color I wanted to use with each stamp!  Here is a look at what the stamped image looks like on canvas (above).  Review your previously made pattern to make sure you know where to start.  Then build your pattern from there!


Here is what my pattern looked like after stamping the images.  This was super simple and easy because of the completely clear photopolymer.  Check out some other patterns used with this stamp set!


It's hard to choose!  I decided to cut out a little of this design for a 4 x 6 frame I had leftover and add to a side table in my living room.  Now my custom print is on display for everyone to see!


Sunday, January 26, 2014

A little birdie


I've had this idea for creating a little mixed media bird for a while now and am finally inspired to make it.  The idea came from seeing adorable metal and ceramic birds in home decor and craft stores.  I have a tendency to see things I like and thinking, "I can make that!"


Seeing various little birdies made me want to make a Stampin' Up! version.  I love the colors and vintage feel of the Soho Subway paper from Stampin' Up!, and so chose to use this for my bird.


I started with a paper mache oval as the bird body.  I tore half of a piece of Designer Series Paper (DSP) into small pieces to be used for covering the paper mache body.  I took a foam craft brush and applied some of the modge podge to the paper mache body.  Then, I applied a piece of the DSP to the modge podged area.  Pressing down, I made sure a had good adhesion to the surface.  Finally, I applied another coat of modge podge to the top of the paper.   


This process is repeated continuously- overlapping the strips of paper as necessary to ensure good coverage- until the entire surface of the body is covered.  Let this dry and even consider an added layer of modge podge to give the body a finished look.

For the wings, I drew out a teardrop shape in proportion to the body and cut it out using scrap paper.  Then I took a light layer of modge podge and coated the surface of the paper I wanted to use for the wings.  This not only helped the paper to hold shape better, but gave the paper the same finish as the bird body.  After drying, I used my wing stencil to trace and cut out wings from the DSP paper.


To give the wings some added flair, I re-traced my teardrop shape in the center of the stencil to achieve a smaller teardrop.  Then I cut that out and used it to trace the smaller design on a different designed paper.  This smaller wing shape was then glued to the center of the larger wing using modge podge.

Once the wings were dry, modge podge was added to the back quarter of the wing at the widest end.  This was then attached to the side of the bird body parallel to the body.  By only adding glue to the first quarter of the body, I could ensure the wings were securely attached while allowing the rest of the wing to have dimension.

The beak of the bird came from punching a 2" circle from DSP.  This was then cut halfway through and the corners of the slit section pushed together to create a cone.  This was glued together and then adhered to the front of the bird body.

Now for the tail!  6" by 1/4" strips were cut from a variety of pieces of DSP in the Soho Subway pack, 6 in total.  The end of the strip was then curled.  After all strips are curled, they were then glued together at the non-curled end and attached to the end of the bird body.  


Details were then finalized for the little bird!  I added two small circles using a black sharpie for the eyes.  On the bottom of the bird, I punched two small holes in the bottom for the insertion of the legs.  To make the legs, I used wire left over from hanging a picture, but any wire will do.  Some pliers were used to curl the wire to make the feet.  After making a pair, the leg was inserted into the body and hot glued in place.