About Me

My photo
Welcome to Artsy Acorn! I love all sorts of art, photography, and making fun and unique items out of trinkets and found items. Enjoy creating and learning with me!

Sunday, January 26, 2014

A little birdie


I've had this idea for creating a little mixed media bird for a while now and am finally inspired to make it.  The idea came from seeing adorable metal and ceramic birds in home decor and craft stores.  I have a tendency to see things I like and thinking, "I can make that!"


Seeing various little birdies made me want to make a Stampin' Up! version.  I love the colors and vintage feel of the Soho Subway paper from Stampin' Up!, and so chose to use this for my bird.


I started with a paper mache oval as the bird body.  I tore half of a piece of Designer Series Paper (DSP) into small pieces to be used for covering the paper mache body.  I took a foam craft brush and applied some of the modge podge to the paper mache body.  Then, I applied a piece of the DSP to the modge podged area.  Pressing down, I made sure a had good adhesion to the surface.  Finally, I applied another coat of modge podge to the top of the paper.   


This process is repeated continuously- overlapping the strips of paper as necessary to ensure good coverage- until the entire surface of the body is covered.  Let this dry and even consider an added layer of modge podge to give the body a finished look.

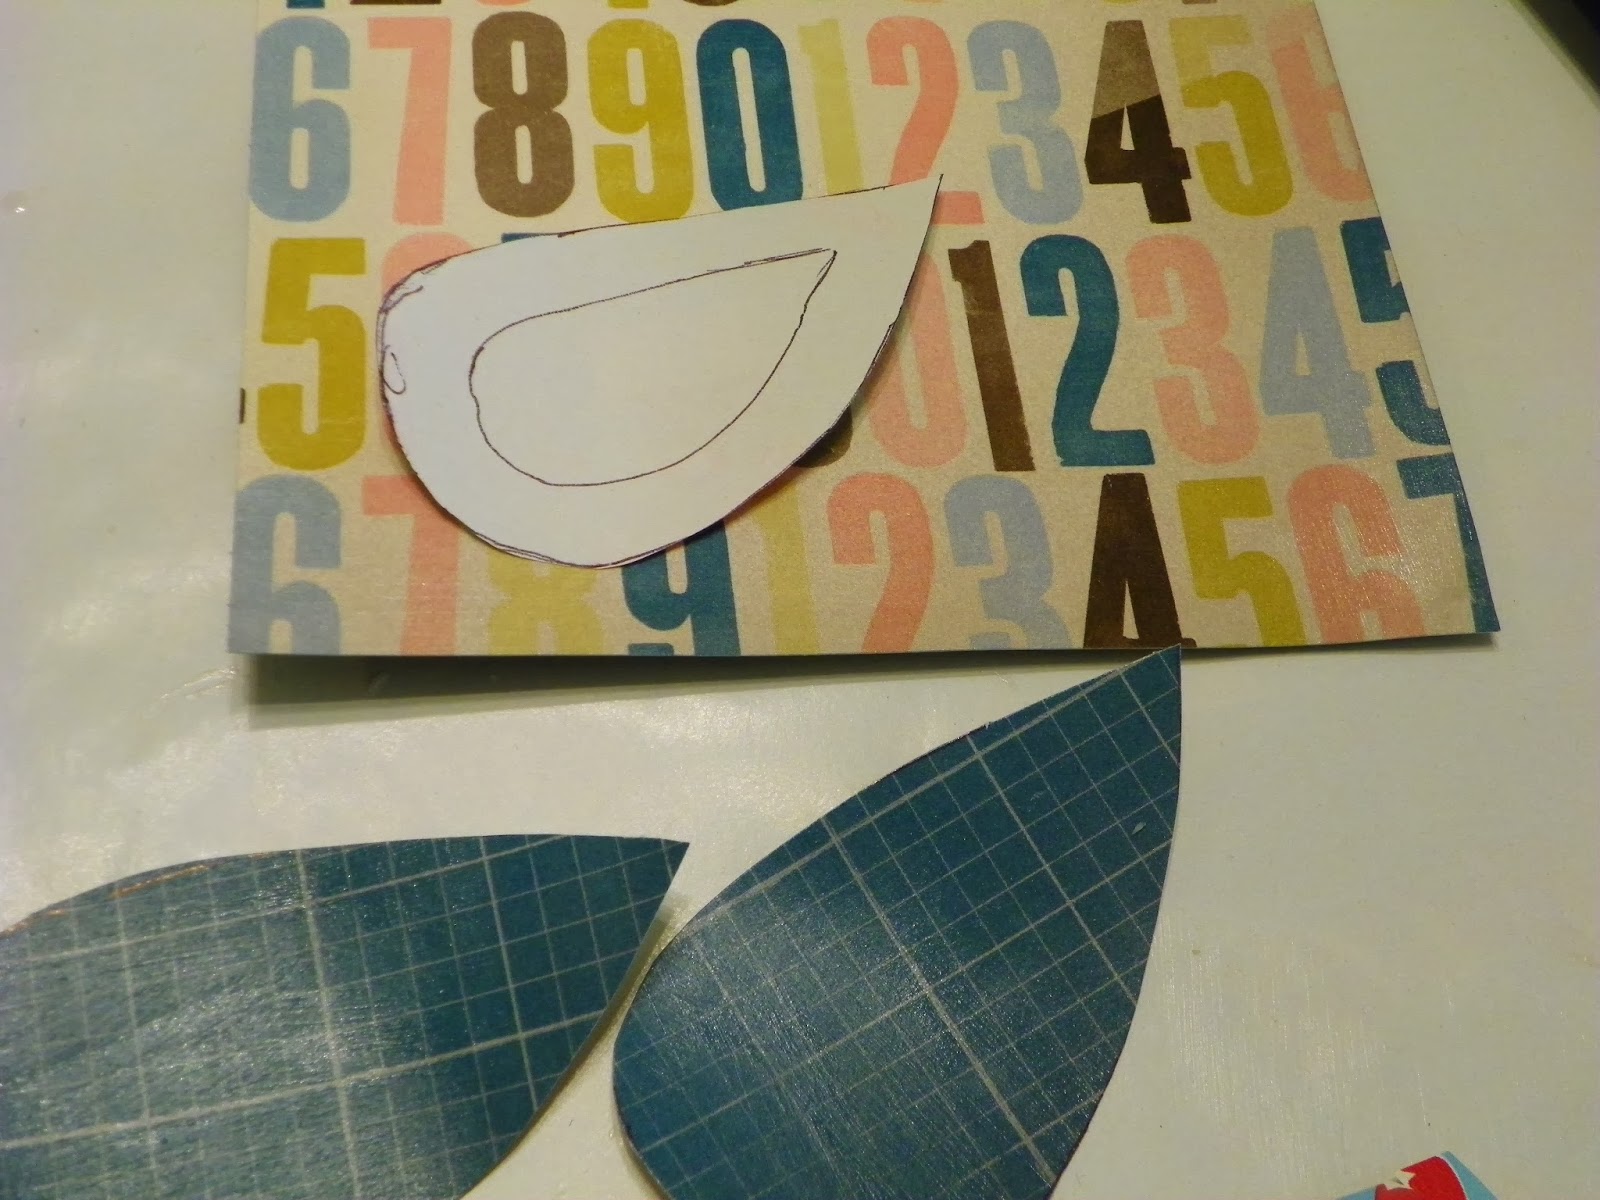
For the wings, I drew out a teardrop shape in proportion to the body and cut it out using scrap paper.  Then I took a light layer of modge podge and coated the surface of the paper I wanted to use for the wings.  This not only helped the paper to hold shape better, but gave the paper the same finish as the bird body.  After drying, I used my wing stencil to trace and cut out wings from the DSP paper.


To give the wings some added flair, I re-traced my teardrop shape in the center of the stencil to achieve a smaller teardrop.  Then I cut that out and used it to trace the smaller design on a different designed paper.  This smaller wing shape was then glued to the center of the larger wing using modge podge.

Once the wings were dry, modge podge was added to the back quarter of the wing at the widest end.  This was then attached to the side of the bird body parallel to the body.  By only adding glue to the first quarter of the body, I could ensure the wings were securely attached while allowing the rest of the wing to have dimension.

The beak of the bird came from punching a 2" circle from DSP.  This was then cut halfway through and the corners of the slit section pushed together to create a cone.  This was glued together and then adhered to the front of the bird body.

Now for the tail!  6" by 1/4" strips were cut from a variety of pieces of DSP in the Soho Subway pack, 6 in total.  The end of the strip was then curled.  After all strips are curled, they were then glued together at the non-curled end and attached to the end of the bird body.  


Details were then finalized for the little bird!  I added two small circles using a black sharpie for the eyes.  On the bottom of the bird, I punched two small holes in the bottom for the insertion of the legs.  To make the legs, I used wire left over from hanging a picture, but any wire will do.  Some pliers were used to curl the wire to make the feet.  After making a pair, the leg was inserted into the body and hot glued in place.  


Saturday, January 25, 2014

Christmas! ... In January?


Confession- I’m a little behind in finishing some of my Christmas presents. :/  I’m sure you’ve NEVER heard of someone not able to finish all the projects they set out to make, right? ;) With a house move and my brother being hospitalized many times this fall, I had to let some things slip.

Lucky for me, I wasn’t seeing this friend until January AND her birthday is in January, which was perfect motivation to complete this hand crafted present. 

My friend Rebecca is a super talented jewelry maker and all around awesome gal that also advises a group of sorority women with me.  Both of us appreciate and enjoy crafting in all sorts of ways, and have even been vendors at craft shows together.  Her company name is “The Beading Bird” and much of the display items for her jewelry involve birds.

I found two charming decorative birdhouses at a local thrift shop and decided these were destined for Rebecca!  Her colors are a lovely coral and soft aqua, which I used to paint the houses first.  Craft paint and two paint brushes (a craft foam brush and a smaller brush for details) helped with painting the two colors.  After a few coats of paint and drying time, I finished birdhouses with a coat of varnish.  Here is what they looked like after painting.


Next, I wanted to add some excitement and texture to these birdhouses, and the idea of shingles came to mind.  I measured the width of the birdhouse roof and cut a strip of Very Vanilla paper to that size.  I then ran the strip of paper through my scallop edge punch.  After scalloping the edge, I trimmed the paper to ¼ inch to give me a row of scalloped "shingles." I repeated the process for each surface I wanted to shingle, which meant several rows of the scalloped shingles per side of the roof.


After cutting my paper, I added color by running the edges over the Pool Party ink pad.  This brought out the color of the aqua roof on the birdhouses and added some texture to the look of the paper.  Finally, I coated the inked side of the paper with some Crystal Effects to give the shingles a shiny, lacquered finish.


These paper strips dried overnight, and then were ready for attachment the next day.  I used a glue gun to adhere these to the roof of the birdhouse.  While other adhesives like Tombo glue will work, I found that the drying time of hot glue really helped to expedite this process for me. 

To adhere the rows of shingles, I ran a strip of hot glue along the surface of the roof about a quarter inch from the bottom and adhered the strip of paper to the hot glue, trying not to press down too hard.  This helped me to obtain the raised look of the shingles so they weren’t completely flat against the surface of the roof.  I repeated this process until all roof surfaces were tiled.  Trim any bits that might overhang the edge of the roof.


Now my friend can use these adorable birdhouses in her jewelry display or as decoration in her home!


Wednesday, January 22, 2014

An Artful Kitchen

I had a few photo frames I wasn't using and a little space in my kitchen that needed some love.  Thank goodness for Stampin' Up! and their amazing Designer Series Paper!

My yellow walls match perfectly with the Eastern Elegance DSP paper.  To get started, I trimmed a sheet of paper to 2 pieces cut to 5 x 7 inches.  I then cut out two Whisper White accents using my Apothecary Accents framelits on the Big Shot die cut machine.


I just love the baroque patterns in the Eastern Elegance DSP paper, so I thought it would be nice to incorporate some of the design into this project.  So, I cut out two of the baroque details from the Eastern Elegance paper.  What's great about the DSP paper packs?  The paper is double sided and all the paper coordinates with one another, making the mixing and matching of patterns super simple!  


Then came the fun part!  Since this was being added to my kitchen, I decided to use the lyric, "Hey good lookin'! Whatcha got cookin'?"

I free handed a section of this phrase on each of my apothecary accent pieces using the Bermuda Bay and Pool Party markers on the fine tip side.  A few curly cues and swirls added some extra oomph!


I then adhered the cut out baroque piece to the side of my saying.


This was then adhered to the 5 x 7 piece of paper.  For a final detail, I took a few punched out pieces using Pool Party cardstock and the chevron border punch.


For the last step, these were added to the frames and hung on my wall!  Hopefully this will inspire you to create some fun and simple artwork using some great patterned paper.  Enjoy!


Sunday, January 19, 2014

From Blah to Ta-Da!

I can't take credit for the title- that's the fabulous Nikki Carroll working her magic there!  I was mentioning to her at an event recently how I was working on making my own pattern on black-out curtains I bought for the guest room (aka- the craft room!).  She said, "It's like from Blah to Ta-Da!"  Now I can't think of anything else when I see the curtains!

The Blah part: Plain white black-out curtains to help with the light from the streetlight outside as well as any draft.

The Inspiration: A pretty pillow my mom found for me that brings out the wall color and is very much my style.  :)

I really liked the leaf design on the pillow, which started me thinking about how I could take that same concept and use it with these white curtains.  Enter the Undefined stamp carving kit.

The Plan: Use the Undefined stamp carving kit from Stampin' Up! to create my very own leaf pattern for my curtains.  Undefined is a fun way to make something completely unique that fits your specific needs.  You can see how I took a simplified pattern of the leaf and drew it out before carving the design and mounting it on my wood block.  Details on how to make this comes with the kit.


 I also wanted to capture the pink band in the pillow and remembered that in the "Hello Lovely" stamp set from SU, there is a cute little stamp that would match the embroidery in the pillow.  So, that was added to my design.


The whole process went pretty fast!  Once I inked up my leaf stamp using a Gumball Green color (ink refill mixed with white fabric paint), I rolled it on with a foam craft roller and stamped it on my curtain. Inking again, I slightly rotated the stamp and repeated the process to start my pattern.  

About a quarter of the way down, I started to add a little more space between stamps so it looks like there are less and less leaves towards the bottom.  My trick to doing this?  I paid attention to dividing up the curtain.  For each quarter section, I gave more and more space between stamped images.  By laying curtain panels next to each other when I completed each one, I could ensure that the panels were consistent.  That meant adding a few stamped images here and there occasionally so everything lined up.


For the final detail, I added a few of the pink blossoms stamped in a cascading fashion down the curtain as well, but these were more sparse since I only wanted it as a touch of detail.  The pink is Melon Mambo ink refill combined with white fabric paint.

These dried overnight (throughout each hallway and walkway in my house, which was funny trying to get around!) and then hung back up in the room.  See?


Friday, January 17, 2014

A shady tale...

Let me tell you the sad tale of a lampshade that had seen better days.  The lovely white linen lampshade had let the light shine in my home for several years, until one day when a candle was placed a little too close to it.  The heat from the candle warped one side of the shade, making it forevermore a bit wonky.  What's a girl to do?  With a lampshade that is a solid color, the wonky side of the shade stood out like a sore thumb.  Sure, a new shade would have been rather easy to purchase.  But, a crafter knows better!

By adding a print (or creating a print by stamping the shade), the sad lamp shade took on a new life as a custom and one of a kind accessory (wonky side and all).

Here's what I did.

I took a large stamp that provided coverage with a pattern that I liked.  Here, a typewriter style print gave me the graphic look I wanted, but any stamp will work!

I took a brown fabric paint and a craft foam roller to evenly coat the paint on my stamp (for details, check out my last two posts that goes into this technique in detail).  However, this will work well with ink or staz-on ink as well.  Since my lampshade was a linen type fabric, I wanted to use a fabric paint to get better coverage.


I made the decision ahead of time that I didn't want each side to be the same and that I wanted a little overlap and some angles to my print (the stamped image not all going in the same direction).  This really liberated me to not worrying about "mistakes" so to speak.

The only tricky part? I recommend placing your free hand underneath the area you wish to stamp so you steady the shade and help the surface of the shade to be a little easier to flatten.  

For the sides of the lampshade, I simply angled the stamp a little and rocked it around the edge of each side.  As I wanted some angles in my pattern, this looked intentional!

Once the typed stamp design covered my lampshade, I took a much smaller script stamp and stamped some random images over the typed design in a blue shade (this was leftover mixed fabric paint from my curtains with white fabric paint and Pool Party ink refill mixed together.)

Let this dry, and then add back to your lamp.  Voila!  The previously sad shade is now a happy shade once again!


Tuesday, January 14, 2014

Something old, something new...

Nope, we aren't talking about a wedding!  But, I am talking about how to make something old new again (I even made it blue too!).

The Old: A bed skirt from my grandma that had seen better days.  It was destined for the trash... until I got ahold of it!  I saw a freebie that needed a little life breathed into it and (yahoo) was in need of a bed skirt for my bed!

So, what did I do?  Stamped it!  This is similar to my previous post about stamping fabric curtains, so feel free to review the previous post as well for further insight.


Here's the bedskirt.  It's a white fabric with pale yellow flowers over it.  While I think it is great on its own, it didn't go well with my bedroom.  Enter the Beautifully Baroque stamp and some fabric paint tinted with Coastal Cabana ink refill!  I used a craft foam roller as well to easily spread the paint on the stamp.  Here's another tip: Use the backside of some extra wrapping paper from the holidays as a way to cover your work surface before starting your painting process!

The foam roller is used like a paint roller for your walls- make sure to evenly coat the roller before transferring the paint to your stamp.  Once paint coats the stamp, transfer it to your fabric making sure to use firm, even pressure and lifting the stamp directly up without rocking it back and forth (that way, you won't have any uneven edges to your image).

I built my design by staggering the stamped image along the bottom of the bed skirt, then reversing the image and stamping it upside down on the second row in between the previously stamped images.  You'll want to make sure and re-ink your stamp with paint after each stamp so your color remains consistent.  What's great about a multi-use fabric paint is that it's generally opaque, so the yellow flowers really become part of a background and the baroque stamp becomes the prominent feature.


Tip: It can be a little tricky to navigate the corners of a bed skirt because of the gathering of fabric there.  Try to move and stretch the fabric out as you can to get a flat surface while working your way around.  

Let your fabric dry overnight if possible and even consider washing and drying the bed skirt before putting it on your bed to get rid of the stiffness from the fresh paint.  

Here's the end result!  My something old is now something new, AND it's even blue.  Hope you enjoy!


Sunday, January 12, 2014

Starting 2014 off right!

Hello!  Hello!  How can it be 2014?  This year started off with a move for me in order to be a little closer to my job.  Can I tell you... I really didn't realize how much STUFF I had until it had to be packed up in boxes!

While moves can be stressful, it can also present some great opportunities.  Now that I'm settled in, the fun begins with decorating!

The challenge?  To use my love of antiques and thrift store finds to re-use, re-create, and recycle treasures in creating a beautiful and uniquely decorated home.  So, I dedicate the next several posts to decorating my new home, Stampin' Up! style!

First up?  Curtains.

I've looked long and hard for a pattern and color that went with my vision for my room.  Then, I had a light bulb moment- Why can't I make a pattern myself?!  To get started, I used existing curtains I've had for a while made out of a light canvas material overlaid with a white gauzy fabric.  I then sketched out the idea of how I wanted the curtains to look, which helped me to keep the overall look and feel of the project without losing that vision in the middle of the project.

Let's get started!  You need the following:
-Fabric or curtains you wish to stamp
-Stamps you wish to use.
     I used: Medallion (retired), and a script stamp
-White fabric paint or a multi-purpose paint that can be used on fabric
-Stampin' Up! ink refills in the colors you wish to use.
         I used: Pool Party, Crumb Cake, and Baja Breeze (retired)
-Craft foam rollers (one for each color you choose to use in your print- I used 3 total)
-Paper plates for paint
-Toothpicks or small brush to mix paint
-Stampin' Mist and Stampin' Scrub stamp cleaner
-Paper towels

1. I start by mixing up my paint.  I am obsessed with the beautiful tones of Stampin' Up! colors, so I wanted to use those to get started.  I mixed the fabric paint and ink refill until I obtained the richness of color I wanted.  Here's a tip:  Count the number of drops your add so you can easily recreate the same color if you need to mix up some more paint later!

2. Coat your craft foam roller in your first paint color and then roll over your stamp in even strokes.  Make sure you evenly coat your roller in paint.  I find this feels similar to painting a wall.  
3.  Make sure the fabric is smooth before stamping your image.  After rolling the paint onto your stamp, use firm, even pressure to transfer the stamped image onto the fabric.  Be sure to pick up the stamp evenly when finished.


4.  Repeat the process by staggering the pattern over your fabric.  In the case of this pattern, I wanted the same image to be staggered throughout the fabric in different colors.  So, I chose to do this one color at a time.  Once I staggered the stamped images in the Pool Party, I started the process over in Baja Breeze, then Crumb Cake.

5.  Between colors, I used a wet paper towel to clean off the paint and then dried the stamp off with another paper towel.  Actually, it can help to repeat the cleaning off of paint occasionally while using the same color if you notice any residue build up or paint drying on the sides of your stamp.  I chose to clean the stamp about halfway through the stamping of one color before moving on just to keep the images fresh.


6. When I finished with the three colors in the main stamped image, I wanted to add some additional character to the negative space in the fabric (aka- space between the medallion stamped images).  I chose a script print and used the Pool Party color for this. Use the same foam roller to roll the paint onto your stamp.

7.  I repeated the process with the same script stamp in Baja Breeze.  

8. When completely finished with stamping, I cleaned the stamps with a wet paper towel and then I spritzed the stamps with stampin' mist and used the Stampin' Up! stampin' scrubber.  This helps to keep your stamps conditioned since the fabric paint can cause the rubber to dry out.  

9.  Let the fabric remain on a clean, flat surface until full dry (I draped mine over a table and an ironing board overnight). Once dry, they are ready to hang and be enjoyed!