About Me

My photo
Welcome to Artsy Acorn! I love all sorts of art, photography, and making fun and unique items out of trinkets and found items. Enjoy creating and learning with me!

Monday, September 30, 2013

Pleated Rosette How-To

I love pleated rosettes, especially when I learned how easy they were to make!  There are several tools out there to help you with this from a cricut cartridge, die cut machine, simply scored tool, or even the scoring blade on your personal trimmer.  For this particular tutorial that is accompanying the book wreath, I went with the simply scored tool from Stampin' Up!  Before we get started, here are some other things I have made using an old candlestick and some dowel rod.  These normally sit on my dining room table.


So now are you excited to learn how to make a pleated rosette circle?


1.Cut a piece of card stock in half, creating two pieces that are 11 x 4 1/4".

2. You will take a scoring tool or a scoring blade on a personal trimer and make a score line every 1/2 inch.  Repeat with the other piece until your strips of paper resemble the lines on the sheet pictured.


3. You will then create a zig zag with folding these pieces of card stock.


4. Once complete, glue the ends of two pieces together to create an extra long pleated piece.  Make sure the piece will pinch together to make a circular piece.  Not big enough for you?  Add another strip of card stock.


5. When the pleated piece is the size you want, glue the piece end to end, so it looks like a tube.  You'll then pinch the ends together of one side and glue a small circle of the same color card stock.  This will let your pleated circle stay together.


6.  Add your pleated circle to the book wreath, a banner, or any other project you have to add some pop!

Feeling Bookish

Two weeks in the new job and I am loving working and being helpful to others!  Before I started, I felt the need to decorate my office (since to a crafter, this is almost as important as the job itself!).  I made a wreath out of a vintage atlas of coordinates I found at a thrift shop.  Here is the finished product!

Now here is how I made it!
1. Tear out several sheets of the book.  I used 25 sheets for the larger outer ring and then 20 sheets of the smaller rolled paper for the two smaller rings.
2. Roll the larger rings by starting in the top left corner of the paper. Continue the roll until you have the edge of the paper wraps around the side.  Take a hot glue gun and secure the edge of the paper with the glue.  I don't recommend tape, since I had a hard time getting this to stick. Complete this with all of your large cone pieces.

3. Cut a large circle out of card stock.  This will become the base that you glue your cone pieces to in order to make the wreath.

4. Place your cone shaped pieces of paper together with the smallest ends facing each other centered on the piece of card stock.  This should allow you to form a circle out of the pieces.  Pick a piece up once at a time and hot glue them to the circle base.  Once finished, you will likely need to glue some of the pieces to each other to give more structure to the overall wreath.

5. Start rolling your smaller cones.  You will start in the same top left corner and make a tighter roll (see picture).

6. You'll want to glue these pieces together with hot glue as well, being sure to make sure it is glued together from top to bottom (see step 7 and it will make sense!)

7.  You'll need to cut the small cones into a 2/3 section and 1/3 section respectively.  If the piece is glued from corner to corner, then it won't fall apart when cut.

8.  Not start your pattern with the 2/3 cut smaller roll.  These were staggered between the larger pieces between the cones and hot glued down.  Don't worry if there is a little space in the center of the circle that has a gap- it will be covered by the pleated circle piece.

9. Take the 1/3 size pieces and stagger in between the 2/3 pieces, making sure to make the circle smaller as you go.  Hot glue these down.

10.  Create a pleated circle for the center (a tutorial on how to do this are included in my next blog!)

11.  Glue your pleated circle to the center of your wreath.

12. Add any additional touches to the center of your circle.  Here, I took two fancy flower punched pieces (one in a black and white typeface and the other on glitter paper) and layered them under a bottle cap and vintage button with twine.

13.  Finally, glue a loop of ribbon to the back of the wreath.  I glued mine along the spine between two of the paper cones.  Now you are ready to hang and enjoy!


Sunday, September 8, 2013

The real world is calling

I'm about to start a full time job again, which means my escapades of crafting and piddling with things at will are going to be over sooner rather than later.  So, I make a list of several things I want to accomplish before starting work again so I don't have as much on my plate.  I have been painting up a storm and making all kinds of things lately!  My apartment looks like a science experiment.

First, what crafter can't bring some homemade goods to their new workplace?  I have set out to make a wreath made with antique book pages.  I've made the cones at this point, and have a pile on my living room chair.  Stay tuned for pictures on a how-to!

I also found some 25 and 50 cent old frames at a thrift shop, which I painted this weekend.  I found that since 2 of my walls are cubicle style, I will be able to just stick these up with some velcro!  The frames are painted and ready for some inspirational quotes (and I'm waiting for inspiration to hit me to find something).

Finally, I'm getting ready for a large charity crop for the Rape Crisis Center this week, which means putting together freebies for the goodie bags, a raffle giveaway, and a make and take.  While those are together, I still need to get out my items for the display table and figure out what the heck to make myself?  I'm thinking of some Christmas card ideas (I know it's early) to sell at craft shows coming up.

I leave you with another card I made with the undefined stamp carving kit.  I thought about how I loved the bird, and it really needed a nest.  So, I made one!  Keep in touch and I will have pics of all these in progress projects soon!


Tuesday, September 3, 2013

Here comes the bride!

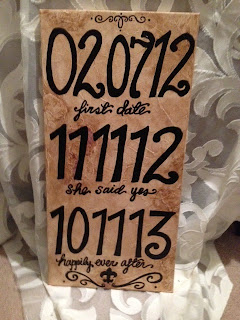
Call me a romantic, but I just love everything about weddings!  I especially love making wedding presents, and found this idea on Pinterest a while back.  There is just something about a customized wedding gift that is so personal and really shows thought and intent on the givers part.  While the technique and font came from me, I just loved the idea of telling a the couple's love story that features three dates- first date, the proposal date, and wedding date.  This idea can be used for other things too- what about down the road making one with date's of your children's births, or even dates for big occasions like a job promotion, or a big travel trip?


Here's how I went about this.  I first sketched my idea and practiced my font and layout on a piece of paper.  I wanted the numbers to be roughly twice the space as the sentiment written below since the feature for me was telling the story in numbers.

Next, I went canvas shopping, and because I don't like to buy anything that isn't on sale, found a good deal of these guys in a 2-pack.  I prefer the longer rectangular canvas, but go for whatever you prefer or will fit with your decor.  These are 10" by 21" and I've used larger before depending on the space etc.


Materials used in total for this project:
-Scratch Paper and pencil
-Ruler
-Eraser
-Canvas of your choice
-Heavy acrylic white paint
-Small artist trowel
-Burnt Umber acrylic paint
-Super Sharpie with fine tip
-Medium artist brush
-Paper towels
-Acrylic painting spray sealer

I love the look of plaster, and wanted to add that texture to this canvas.  To achieve that look, I first took acrylic white paint and the trowel and covered the entire surface of the canvas.  I didn't want the paint very thick, but I wanted enough to take away the texture of the canvas.  Don't worry about this being even and neat- the little peaks and imperfections in the trowling work is what gives the finished piece character!

I normally let this dry overnight.  I then like to take some burnt umber or any brown acrylic paint you have around and mix with a little water to create a wash.  Using the brush, I apply this to the surface of the canvas, then use a paper towel to gently wipe of excess.  Only do a section at a time so you don't have a spot drying while you are working.  This takes some time to do because you want to make sure you have a relatively even color, which might mean reapplying a little of the wash in areas again.  Warning: avoid creating light spots by going over your paint again before it dries.  I've found that if I try to make an area darker when the paint didn't have a chance to set, I ended up wiping all of it off and messing up.  Just play around with this until you get the color you want.  Then let it dry completely for a few hours or speed it up with a fan or hair dryer (these things are a multipurpose tool for a crafter, aren't they?)

Next, measure out and mark your canvas.  I wanted extra space at the bottom for an embellishment, but needed to make sure everything else was even.  My final pattern was a one inch top, 4 inch numbers, 2 inch sentiment, then numbers, sentiment, numbers, sentiment and bottom piece.  In essence, you need to mark lines lightly on your canvas to make a grid to follow.  I used a ruler or yard stick for this and a pencil.  After my grid was complete, I outlined my sayings and numbers.  Do this as lightly as possible so you can see your lines, but not have too much to clean up later!

The lettering and numbers are with a sharpie.  I found I could write this out much better than painting it, so this is a personal choice.  I colored my numbers and letters in.  Make sure you have a steady hand and take your time.  I've run into two issues that might help you:  One, work from left to right, and top to bottom letting each item dry before moving on.  Sharpie dries a little slower on acrylic paint, and you can accidentally get some on your arm and transfer it elsewhere on the canvas if you aren't paying attention.  Two, beware of those pretty trowel lines you made earlier.  They can make keeping a nice line for your letters or numbers a little more tricky if you aren't steady with your hand.

Once all writing is finished, I like to spray the canvas, including sides, with an acrylic sealer so it is easy to dust and maintain.  Do this outside or in a well ventilated area and give plenty of time to dry.  Pay attention to how you want the end result to look since these sealers come in gloss, satin, matte etc.  I usually use a satin unless I really am looking for a different look.

Voila!